Wednesday, 9 December 2009

The end!


A collaboration of all three stamps.
The envelope was made using various layer masks and overlays, i eventually got the image and was overall impressed with the outcome, however the envelope was really small so my stamps had to be minimised and its hard to see the detail within them.

Stamp 2 revised (forgot the queens head :D)


Finished Bee Stamp


Final Bee Stamp,
Created:
- From the final model i labeled each area of my model with a seperate ID
- i then applied different materials to each of these groups.
- The material used for the main body i created in photoshop, i used a simple stripe pattern in the colours shown on the model, i then applied a artist sketch texture to the stripes to get a more realistic effect.
- once all materials were applied, i used a noise bump modifier to the bee body and head in order to achieve the texture shown.
- I then introduced 3 omni lights to the stage to get the lighting effect, the omni light in between thw wings have an include so the only effect the wings
- i applied a target spot light to the antenna and also applied an include so it does not effect the head.
- then rendered in desired size and saved, i then opened it in photoshop and applied it to the stamp layout.

Tuesday, 8 December 2009

Terrain


This is my attempt at creating a terrain background which i was going to use for one of my backgrounds on the stamp but it eneded up too dark to be used, i created it using a simple soft selection and added a material to the top with a various amount of bump texture to it

Monday, 7 December 2009

Stamp 2 - Frog

My finished Frog Stamp, missing the queens head, but thats easily sorted!
- Again using simple omni lights i was able to get the desired effect on the frog itself
- I created the leaf the same way as in the tutorial fro week 3/4
- I put an omni light directly on it to iluminate the bump effect of the leaf
- Then simply placed the frog on this and rendered

Experimenting


Using different bump maps i managed to create a body of water, i was creating this to get some ideas on what background images to use for my stamp.

Sunday, 6 December 2009

Frog


The frog texture was created using a simple artist texture in photoshop, i added a bump map to it and got the final result by altering the gloss finish. Although it does look strange with white eyes!

Friday, 4 December 2009

Fur attempt


Bee with fur, this particular modifier is really hard to get right, i have been trying to use it but so far with no real results.

My Finished Stamp - Lily


This is my final stamp for my lily although I am still debating whether the green background suits, but that is fairly easy to modify if necessary. This stamp took numerous steps from my last blog so I will be bullet pointing each step to give you an idea of what I did.

1. After creating my model to the final standard I then had to add lighting, I rotated my image from its initial standing up position so it was lying down. I then began testing various lighting techniques to see which turned out the best, I decided on the Omni light.

2. I found an area of my image on close up that I wanted to use for the stamp, which is the image you see in the background and positioned two Omni lights to get the best effect. An Omni light was placed above and below the image each having a slightly different intensity and also density.

3. I used the camera to focus the area on my choice so if for some reason the image was moved I was able to access that exact image again at a click of a button.

4. I then rendered, each time tweaking the position of the lights until it looked perfect.

5. This I then saved and loaded into Photoshop. I placed the image within the frame with a black background and slightly changed the opacity as I would be using it for the background.

6. Rendering the second flower I used a slightly different method, I positioned the image so I was able to see virtually all the flower then rendered, however the render was done using the metal ray render with an Omni light positioned above, and then saved.

7. I then used the material editor to change my whole image white; this was in order to get all shadows showing correctly when using a particular modifier on the Omni light. This shader modifier rendered my whole white image with sketch like shading. I then saved this image.

8. I opened both the previous saved renders in Photoshop and laid them on top of one another; I then used the overlay modifier and changed the opacity slightly to get the final image which I dragged and dropped onto the stamp.

Ihave managed to to finish my texture on my lily quite effectively, due to the fact the lily only really consists of two colours i used photoshop and filled a blank rectangular document with two colors.
In order to get the blured effect between the two colours i used the motion blur filter. Then using a new layer i applied an artist effect texture to get the slight bumpy texture, i also achieved this using the bump tool within 3ds max. I then applied this to the image using the the material editor, i positioned the material using the gizmo tool as the material required some manipulation to get it into the right place. I now have to use lighting and i will be done.

Friday, 27 November 2009

Lily


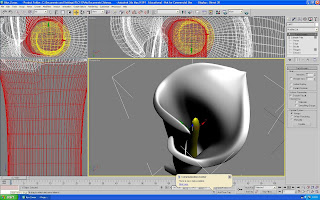
This lily is almost done, i have managed to fold the petal out further to get a more realistic effect and have created the stigma in the centre using a simple stack of polygons.
Im really happy with how it has turned out, i will be attempting to add some texture and also change the stem colour green.

Wednesday, 25 November 2009

rendered version


Lily


Producing my lily has been a nightmare to be honest, there was so many different ways i began to construct the flower to no avail, the way i finally produced the model i have now was using the lathe tool, i drew a rough spiral using the line tool and created what looked like a straw, i extruded from there and then after a few tedious hours i managed to create this.

Friday, 20 November 2009

SWOT analysis

As I’m not sure what area to focus on with this analysis I’m doing it to what I believe is correct?

Strengths:
I believe a huge strength with regards to this module comes from the passion to create; I realised this year that I love modelling and as a result will make sure all my work is done to the best of my ability. I have come familiar with the basic tools and presets.
Weaknesses:
A weakness definitely comes from a lack of knowledge with any type of 3D software, I had a look at it in my first year as a friend of mine used it for a piece of work, and was completely confused and decided to steer clear until I needed it, that said my knowledge now has improved dramatically although there is still much to learn, I’m plodding through nicely :P.
Opportunities:
Opportunities is a vast subject, There is many more things I would like to learn and hope I will in the next semester and following on through to my final year, animation will be a big stepping stone and I hope it will be just as enjoyable as modelling has been, although I am guessing it’s going to be more time consuming, but who knows??
Threats:
Threats definitely comes in the form of time, modelling so far has consumed most of my timetable and I still feel that I am falling behind, with 3 weeks left there is not much I can moan about as I need to get on with it, This threat spurs from a strength due to the fact that if I wasn’t so meticulous with getting things done perfectly then I would be ahead now.

mapping


This is my frog with mapping, it hasn't come out at all how i wanted to look and therefore i will be making my own texture to put on the frog this is due to the fact that this mapping is extremly messy and unorganised and it is very hard to find an image of a frog texture that you dont have to stretch to fit over your own model.
p.s the eyes are looking the wrong way, pain!

WINGS!!!


My bee finally has some wings, almost finished now, i am going to do some fine tuning on the body, add the eyes and then texture, 2 down 1 to go :D

Bee antenna


When i modelled the legs i used the extrude and inset tool, i created the antenna using the same principles and am very happy with the result, this antenna will be cloned and used on the other side so they are identicle

Bee with legs!


These legs on the bee took a fair bit of time, luckily once i had created one leg by extruding and and using the inset function i was able to duplicate the leg twice and by changing the angle use it for the other two legs.

Wednesday, 18 November 2009

bee revised


I found it easier to model the bee on a side view image, i was able to get the proper shape and as a result i began the bee again.

Friday, 13 November 2009

and...begin again


after days and days of trying to accurately map my frog whilst turbo smoothed, i gave up, i re done the frog map whilst turbosmooth was off and thankfully it didnt take longer than a day, i hope to start putting the texture on it now and hope for the best.

Wednesday, 11 November 2009

Beeeee!!!


This is my second model and i have decided to create a bee, this is due to the fact that there has been a lot of press about the decline of bees in the uk. i modelled my wing the same way i modelled the leaf in the tutorial, im quite happy with the outcome and hope once the modelling is finished i will be able to change the positioning of the wings and body to make it look as if it is in flight.

Friday, 6 November 2009

Mapping


This is my first attempt at mapping my frog, its like a giant jigsaw and it fairly hard to put all together, and also very!! time consuming.

Thursday, 5 November 2009

Frog almost done


This model just requires the front feet and eyes and it will almost be done, i will then need to map the object to use textures as there are many different types of patterns a frog can have.

Friday, 30 October 2009

frog with feet


Monday, 26 October 2009


I have decided on a second stamp I will be creating a calla lily, this flower although not rare has such elegance to it.
It defiantly should be hard to model as it contains many curves and intricate folds, should be a fun challenge.

Frog with legs (kinda)


This is a progression of my frog body, it now has legs woo, now for the feet???

Friday, 23 October 2009

HALLOWEEEEENNNNN!!!!!!


My pumpkin, using different light effects.

Friday, 16 October 2009

Attempting my first stamp


This is my first attempts at my biodiversity stamp, it is the body of a frog and i will be modelling the legs seperately.

Friday, 9 October 2009

Leaves!!!

Leaves created using photoshop and the material tool.

First image with use of the material tool

Saturday, 3 October 2009

Testing the waters


Model of a horn

Friday, 2 October 2009

Chess piece


This is my chess piece

Wednesday, 30 September 2009

Mood Board


Mood Board, minimalist but i think is still effective!, the animals are dipicted in the puzzle pieces and the landscapes in the background, read it how ya want :D!!!!

Friday, 25 September 2009


This is my first attempt with 3D Studio Max, im pretty happy with that, a very time consuming bit of kit, but good fun to use!

Lecture 1: Reaction to Brief

We have been giving a brief about biodiversity, my first impression was that of uncertainty as i was unsure how we were going to link this to animation. The assessment outlined that we were going to be creating 3D images which will be placed on postage stamps in the size of 52p, and 62p and these will need to link to the biodiversity subject, this reminded me of a stamp i saw whilst in the states which was of a polar bear, this helped with the understanding of what i will be doing and gave me some ideas on what i might do myself.

My reaction of the Aesops Fables was a tad confusing as i had no idea what this actually was so therefore had no idea on how i was going to link this to animation. i was told where to find out about this subject and will be reading up on it for the next lecture.